Tyranid Codex review Part 2: HQs part 2
This is the second part of the Tyranid codex review which will cover the remaining three HQ choices that are available for Tyranid players. The first part can be found here Tyranid Codex Review Part 1
Tervigon
This is the first of the new units. Perhaps uniquely,
this is a HQ unit that can be fielded as a troops choice, as well as it
being a monstrous creature. This only costs 10 points less than a
tryant but has considerably inferior statistics, with a below average
weaponskill, meaning marines hit you on threes, and only three attacks.
It does come with a 3+ save and the usual high toughness of a tyranid
monstrous creature. Its strength is however not brilliant.
It comes free with a 3+ save, claws and Stinger Salvo.
Lets look at the upgrades:
May
take either Scything Talons or Crushing Claws. I think the claws are
strictly inferior to the talons, mostly due to the points cost
difference, as they should not cost five times as many points. Scything
talons might be worth it, they are a small points investment.
It
has the same biomorphs as the Hive Tyrant. However in this case both
Toxin Sacks and Adrenal Glands are worth taking as he passes on the
bonuses to termagants within 6 inches. More on this later. The only
other biomorph worth considering is again regeneration.
May
replace Stinger Salvo with Cluster Spines for free. You want to do
this. I can't really see the point in Stinger Salvo, it is virtually
always worse than Cluster Spines.
It comes with the following
Psychic power, Dominion which can increase its synapse range by 50%.
Pretty good for a free power. It may also purchase two additional
powers at a reasonable cost. Catalyst that can give a unit within 12
inches feel no pain and Onslaught which allows a unit to shoot and run
in the same turn. Buying both powers for all Tervigons may be quite an
expensive thing though, so just buy them if you need to have them. You
probably don't need all three on all your Tervigons.
Now lets
look at his special rules. The first and most important one is The
Scuttling Swarm in the Termagants entry. This allows you to take one
Tervigon as a troops choice per unit of termagants. This means you can
include up to 5 Tervigons in an army, two HQs and 3 troops choices. You
will probably want to field Tervigons as troops, to take advantage of
all the benefits of being a scoring unit.
It is a synapse
creature, psyker and has shadow of the warp, like the Hive Tyrant before
it. I won't cover these rules again here. It does however have a
couple of unique special rules which pretty much are the main reason to
include one, apart from being made scoring of course.
First up
is Spawn Termagants. This rule is fairly self explanatory, it gives you
free Rermagants. They come with just a fleshborer and no upgrades. It
spawns 3d6 worth but any doubles means it has run out for the rest of
the game. They have to be placed close to the Tervigon. You will
probably need to own around twenty spare Termagants per Tervigon,
although less per model will be needed if you have a lot of Tervigons.
You don't need to spawn them every turn, so you can hold them back
inside their "transport" until they are needed.
Secondly, Brood
Progenitor, which was covered earlier, it allows the Toxin Sacks and
Adrenal Gland upgrades on the Tervigon to be passed onto Termagants
within 6 inches, they can also use its high leadership for tests they
are required to take and it also gives Termagants counter attack special
rule. The downside is if the Tervigon dies, it inflicts 3d6 hits
wounding on 4+ against every termagant unit within 6 inches. The
obvious issue with this is that your units only get the advantages being
within that range, so be wary of this occuring.
Conclusion:
The
Tervigon is an important creature. It can be included as both a HQ
where it is averagely useful or as a Troops choice where it is
considerably better. While you can build your entire army around them,
you are heavily limiting other choices that you can take, and this is
not always a good thing. I would recommend taking no more than three,
and if you do that, you probably want one of them to be a HQ choice, as
to not limit your troops too much.
Good Options: Toxin Sacks, Adrenal Glands, Regeneration, Cluster Spines, Dominion, Catalyst, Onslaught.
Bad Options: Crushing Claws, Acid Blood, Implant attack, Toxic Miasma, Stinger Salvo.
Tyranid Prime
This
is the cheap option for a HQ. Its base price is less expensive than
any marine HQ by 20 points, and it is about 50% cheaper than any of the
other Tyranid HQs, this choice is a good one for keeping HQ costs down,
as well as playing wound allocation games. We will go into this later.
Looking
at its statline, it is something between a tyranid warrior and a hive
tyrant. It basically has +1 in every statistic apart from Leadership
over a tyranid warrior. Nothing really to complain about here.
It
comes free with a 3+ save, a Devourer and a set of Scything Talons.
Not bad, but you will probably want to take advantage of some of its
upgrades. Lets look into them.
May replace Scything Talons with
either Rending Claws, a pair of Boneswords, or a Lashwhip and
Bonesword. Prices go gradually, but you probably want to take a
Lashwhip and Bonesword for the utility function of the Lashwhip.
May
replace Devourer with Rending Claws, Spinefists, Deathspitter or
Scything Talons. You probably want to either take Rending claws to
increase your usefulness in combat against tanks and dreadnoughts, or a
Deathspitter if you are in a shooting unit. Spinefists are laughably
bad and you probably want something better than Scything Talons.
For
Biomorphs it can take Adrenal Glands, Toxin Sacks and Regeneration.
All three are quite useful. Regeneration comes into its own when the
Prime is attached to another tyranid unit so it can exploit the wound
allocation rules. It can join broods of Carnifexes which benefit quite a
lot from this ability, as the Prime gets Regeneration incredibly
cheaply.
It has the following special rules, Synapse, Shadow in
the Warp, Independent character and Alpha warrior. Alpha warrior is
unique to this unit, and allows the Prime to share its weaponskill and
ballistic skill with any warrior unit it joins. Most useful for its
ballistic skill, because warriors already have a higher than average
weaponskill.
Conclusion:
Being an independant character
it can join any unit which has a maximum unit size over one. This
allows it to join broods of Carnifexes even if there is only one in the
unit. It is however best placed within a warrior unit to pass on its
statistic bonus. The main reason to include one is if you are trying to
keep HQ costs low.
Good Options: Toxin Sacks, Adrenal Glands, Regeneration, Deathspitter, Rending Claws, Lashwhip and Bonesword
Bad Options: Spinefists
The Parasite of Mortrex
A
jump infantry special character, which can join units, probably either
Shrikes or Gargoyles. It has a fairly unimpressive statistics set for
its points value, with lower toughness than any of the other HQ
choices. It costs the same base points as a Tervigon.
It comes
with a 3+ Save, Implant attack, Rending Claws and Wings. No weapon
options, so you are stuck with rending rather than being able to ignore
peoples armour save. Not brilliant so far.
The only other things
this model has is special rules. So we might as well look at them. It
is a Synapse creature, so it comes with Shadow in the Warp. It is an
independent character which allows it to join units. Nothing overly
exciting so far, certainly nothing to justify its high price tag. Lets
look at its unique special rules.
Host Organism: This allows
ripper swarms in 24 inches to ignore taking instinctive behaviour.
Considering Ripper swarms are not a great choice, this isn't an amazing
power. However you need to consider the next special rule before
disregarding it completely.
Implant Parasite: Every model
killed by the parasite in combat has to take a toughness test. Any
failed tests create new ripper swarm bases. So this gives Host Organism
ability something useful to do.
The Sarg is Acting strangely:
Every outflanking unit takes a single toughness test. If it is failed,
one model of the owning players choice dies and a unit of d6 bases of
rippers spawns.
Conclusion:
Quite a niche character, it
allows you to spawn lots of rippers. It is reliant on the Parasite
killing things in close combat, and it is quite vulnerable to being
killed in close combat, as powerfists etc will instant death it. You
will need to pick your targets and play quite a canny game to get the
most out of it.
This article is continued in Tyranid Codex Review Part 3
Friday, 27 April 2012

Thursday, 26 April 2012
Tyranid Codex review Part 1
Welcome to the first part of my in depth Tyranid Codex review.
Tyranid Codex Review part 1: HQs Part 1
Hive Tyrant
First up, the traditional Hive Tyrant. This is a monstrous creature, with good statistics, a large choice of biomorphs, weapons, synapse creature and a selection of prepaid psychic powers and upgrades. Shadow of the warp is always a good bonus to have, limiting enemy psychic powers.
This sets you back close to 200 points without taking anything. So it isn't cheap. This is important to bear in mind, as the other HQ choices bring quite a lot to the table meaning the Hive Tyrant is not quite the same auto include unit it was in previous editions.
It comes free with a 3+ save, a lashwhip/bonesword combo and a pair of scything talons. Not the best of the available combinations, but not terrible. Lets go through the options as they are presented in the codex;
Replace Lash whip and Bone sword for an extra pair of scything talons. This is a so so choice, and can work on a budget tyrant build. Will allow the tyrant to reroll all his "to hit" dice in close combat. Its free but you sacrifice the lashwhip and bonesword. This is bad against armies like grey knights where the whip comes in handy for striking first and it is also good vs dreadnoughts. The bonesword is good for dispatching multiwound creatures, but these are relatively rare so the loss of this isn't all that important.
Replace any set of Scything talons with either a twinlinked Deathspitter or a twinlinked Devourer with brainleach worms. Both cost exactly the same price, but the devourer has twice as many shots and at a higher strength. This is a good option. Twinlinked Deathspitter is pretty much worse in every way, except having a slightly better ap value. Two sets of Devourers can turn you into a gun platform with 12 shots at strength 6, but this means not casting one of your psychic powers. All in all a good anti infantry choice, and not bad against light armour and rear armour in general.
Replace one set of Scything talons with either a Heavy Venom Canon or Stranglethorn cannon. In this case the Heavy Venom cannon wins hands down. It is an effective tank supressor as it has high strength and with a small blast can be used somewhat usefully vs infantry. The Stranglethorn cannon is an anti infantry weapon but unlikely to be more useful than a twinlinked devourer. I beleive the Heavy Venom Cannon is a strong choice, as it can be used with a psychic power, where as to get the most out of the Devourer you really want a pair.
Take any of Hive Commander, Old Adversary or Indescribable Horror. Ignore Indescribable horror, for the points it really isn't worth it. Hive Commander is very useful if you plan on using reserves, infiltrators or deep strikers and Old Adversary is exceptionally useful if you don't have scything talons and keep your Tyrant near other units which can take advantage of the rerolls. That said, the rerolls are probably worth the points on just the tyrant on its own, but if it happens to be hanging around units that don't have rerolls built in, then that is all the better. Gargoyles can take the most advantage of this to increase the amount of blinding venom hits, and they should be hanging around a flying hive tyrant anyway.
Now lets look at biomorphs. Some of these can be ignored without too much looking into them. First up Adrenal glands. Do you really need to be strength 7 and initative 6 on the charge? Thought not. Toxin sacks. Do you want to wound on a 2+ or swap that for a 4+ rerolled and pay points for it? Again, thought not. Acid blood could be entertaining against a low imitative combat army but I can't see it being especially useful as you have to lose wounds, so I am not sure it is worth the points. Implant attack is not terrible, but if you have a bonesword it is probably not needed. Toxic Miasma is probably better than Acid blood and could kill quite a lot, but it doesnt help towards combat result. I would probably avoid all of these biomorphs. Regeneration is however useful. It is cheaper here than elsewhere in the book and it could keep the tyrant alive longer.
Psychic powers can be seperated into good and bad quite easily. Lets go through these. Horror requires you to pass a psychic test, so they can take a moral test and then if they fail they fall back, fearless units are immune. Lets not be wasting time with that. Leech Essence has the same range as Horror, but inflicts d3 low strength, low ap hits, which can heal you. Yes please. Paroxysm has the same range as the others and reduces the targets weapon skill and ballistic skill to 1. A very good choice and a key reason to include a Hive tyrant. Finally another poor choice, just incase you didn't realise you should be taking Paroxysm and Leech Essence, up steps Psychic scream. Enemy units take leadership tests and lose one wound per point they fail by. Just not as useful as the other powers, and certainly not as useful as actually shooting them with one of the available guns.
Finally the upgrade that determines what your tyrant will be doing. The choice is essentially do you want to fly, or walk. If you want to fly, you will need to sink a large amount of points into Wings. Please note if you do this, and you need to have WYSIWYG, the new plastic kit forces you to replace one of your weapons sets for the wings with built in scything talons. I suggest converting this, as it really isn't a good build to have just one set of talons.
If you plan on walking, get the Armoured Shell for a 2+ save. Don't bother with the Thorax swarm, it really isn't as good as the other options.
Conclusion:
The Hive tyrant can be customised into pretty much every role you can think of, provided you are willing to pay a substantial amount of points to include him in your list.
Good options: Lashwhip/Bonsword, Twin Devourers, Heavy Venom Cannon, Regeneration, Wings, Armoured Shell, Hive Commander, Old Adversary, Paroxysm, Leech Essence
Bad options: Twin Deathspitters, single set of Scything talons, Toxin sacks, Adrenal glands, Thorax Swarm, Horror, Psychic Scream, Horror
Swarm Lord
This is the special character Hive Tyrant choice. So for 110 points more than the basic hive tyrant, what do you get? Looking at the statistics, you gain a point of Weapon Skill, which takes you to the threshold where a lot of basic troops, such as marines in all flavours only hit you on 5s in combat. This is a massive advantage. However it won't make a great deal of difference against enemy characters. You also gain another wound, which is always nice, and a point of initiative. The initiative is effectively worse than the regular tyrants against elite eldar and grey knights with halberds due to the lack of a lashwhip, but for most opponents, you won't really notice any difference.
The bone sabers inflict instant death regardless of toughness, which isn't bad, but a regular Hive Tyrant can get this built in with Implant Attack without sacrificing its weapon slots. It comes built in with synapse and all four psychic powers as well as Shadow in the Warp, which is useful against a lot of armies. It gets more out of this because it can cast two powers a turn, but it needs to be able to, in order to counter the lack of shooting attacks. The increased synapse range is also very useful for a foot tyrant.
Its four swords give it a 4+ invulnerable (4++) save in close combat which will go a long way to keeping it alive against other armies. No tyranid creature has a ward save, so this is about as good as it gets.
The Swarm leader special rule is okay, the option for furious charge and acute senses will probably not be as useful as taking preferred enemy, but since furious charge on the Swarmlord itself makes it initative 7, this could come in handy on some of the occasions mentioned above.
Alien Cunning is similar to the Hive Tyrants Hive Commander ability, but trades off outflanking a unit of troops for re rolling the side an outflanking unit appears on.
Conclusion:
So we reach the point when we determine if he really is worth including. The Swarmlord comes with a fair amount of special rules, good statistic increases and a 4++ save in close combat, but at quite an expense. Notice there is no option for wings or armoured shell, which doesn't fill me full of confidence in his abilities. Taking everything into account, the Swarmlord can be a competitive choice, but it is perhaps not an optimal one. He just doesn't have the flexibility of the standard tyrant.
Tyrant Guard
Any hive tyrant and indeed the Swarmlord can include a tyrant guard unit of one to three models.
These are expensive costing the same price as the wings upgrade and offer a fairly reasonable statistics line. Above average weaponskill, strength, toughness and attacks, along with two wounds and 3+ saves they are fairly formidable in close combat.
They come for free with scything talons and rending claws, but can trade the talons for either a lashwhip or a bonesword. The entire brood must take the same option. Depending on what you gave your hive tyrant, and if you took Old Adversary, this may or may not be a good idea. Remember the idea with close combat is to be able to kill an enemy unit in their close combat phase, so you can consolidate, then charge again in your next turn. You really don't want to be out in the open in their turn. So with this in mind, you probably don't want to include the boneswords, but you might want lashwhips.
Conclusion:
A unit with strong statistics, but expensive. If included will bring the price of a foot tyrant up to that of a flying one, with nowhere near the speed, but a better close combat ability due to extra attacks. Due to how the unit works, the tyrant cant be picked out by shooting, but as an independant character suffers from wound allocation and can be attacked specifically in close combat. If you buy the tyrant regeneration you can put a wounding hit early onto the tyrant in the hope that you recover it through regeneration and leech essence. I would include one or two of these for a foot tyrant, but none for a flying one. Swarmlord will want his armed with lashwhips.
This is continued in Tyranid Codex Review Part 2
Tyranid Codex Review part 1: HQs Part 1
Hive Tyrant
First up, the traditional Hive Tyrant. This is a monstrous creature, with good statistics, a large choice of biomorphs, weapons, synapse creature and a selection of prepaid psychic powers and upgrades. Shadow of the warp is always a good bonus to have, limiting enemy psychic powers.
This sets you back close to 200 points without taking anything. So it isn't cheap. This is important to bear in mind, as the other HQ choices bring quite a lot to the table meaning the Hive Tyrant is not quite the same auto include unit it was in previous editions.
It comes free with a 3+ save, a lashwhip/bonesword combo and a pair of scything talons. Not the best of the available combinations, but not terrible. Lets go through the options as they are presented in the codex;
Replace Lash whip and Bone sword for an extra pair of scything talons. This is a so so choice, and can work on a budget tyrant build. Will allow the tyrant to reroll all his "to hit" dice in close combat. Its free but you sacrifice the lashwhip and bonesword. This is bad against armies like grey knights where the whip comes in handy for striking first and it is also good vs dreadnoughts. The bonesword is good for dispatching multiwound creatures, but these are relatively rare so the loss of this isn't all that important.
Replace any set of Scything talons with either a twinlinked Deathspitter or a twinlinked Devourer with brainleach worms. Both cost exactly the same price, but the devourer has twice as many shots and at a higher strength. This is a good option. Twinlinked Deathspitter is pretty much worse in every way, except having a slightly better ap value. Two sets of Devourers can turn you into a gun platform with 12 shots at strength 6, but this means not casting one of your psychic powers. All in all a good anti infantry choice, and not bad against light armour and rear armour in general.
Replace one set of Scything talons with either a Heavy Venom Canon or Stranglethorn cannon. In this case the Heavy Venom cannon wins hands down. It is an effective tank supressor as it has high strength and with a small blast can be used somewhat usefully vs infantry. The Stranglethorn cannon is an anti infantry weapon but unlikely to be more useful than a twinlinked devourer. I beleive the Heavy Venom Cannon is a strong choice, as it can be used with a psychic power, where as to get the most out of the Devourer you really want a pair.
Take any of Hive Commander, Old Adversary or Indescribable Horror. Ignore Indescribable horror, for the points it really isn't worth it. Hive Commander is very useful if you plan on using reserves, infiltrators or deep strikers and Old Adversary is exceptionally useful if you don't have scything talons and keep your Tyrant near other units which can take advantage of the rerolls. That said, the rerolls are probably worth the points on just the tyrant on its own, but if it happens to be hanging around units that don't have rerolls built in, then that is all the better. Gargoyles can take the most advantage of this to increase the amount of blinding venom hits, and they should be hanging around a flying hive tyrant anyway.
Now lets look at biomorphs. Some of these can be ignored without too much looking into them. First up Adrenal glands. Do you really need to be strength 7 and initative 6 on the charge? Thought not. Toxin sacks. Do you want to wound on a 2+ or swap that for a 4+ rerolled and pay points for it? Again, thought not. Acid blood could be entertaining against a low imitative combat army but I can't see it being especially useful as you have to lose wounds, so I am not sure it is worth the points. Implant attack is not terrible, but if you have a bonesword it is probably not needed. Toxic Miasma is probably better than Acid blood and could kill quite a lot, but it doesnt help towards combat result. I would probably avoid all of these biomorphs. Regeneration is however useful. It is cheaper here than elsewhere in the book and it could keep the tyrant alive longer.
Psychic powers can be seperated into good and bad quite easily. Lets go through these. Horror requires you to pass a psychic test, so they can take a moral test and then if they fail they fall back, fearless units are immune. Lets not be wasting time with that. Leech Essence has the same range as Horror, but inflicts d3 low strength, low ap hits, which can heal you. Yes please. Paroxysm has the same range as the others and reduces the targets weapon skill and ballistic skill to 1. A very good choice and a key reason to include a Hive tyrant. Finally another poor choice, just incase you didn't realise you should be taking Paroxysm and Leech Essence, up steps Psychic scream. Enemy units take leadership tests and lose one wound per point they fail by. Just not as useful as the other powers, and certainly not as useful as actually shooting them with one of the available guns.
Finally the upgrade that determines what your tyrant will be doing. The choice is essentially do you want to fly, or walk. If you want to fly, you will need to sink a large amount of points into Wings. Please note if you do this, and you need to have WYSIWYG, the new plastic kit forces you to replace one of your weapons sets for the wings with built in scything talons. I suggest converting this, as it really isn't a good build to have just one set of talons.
If you plan on walking, get the Armoured Shell for a 2+ save. Don't bother with the Thorax swarm, it really isn't as good as the other options.
Conclusion:
The Hive tyrant can be customised into pretty much every role you can think of, provided you are willing to pay a substantial amount of points to include him in your list.
Good options: Lashwhip/Bonsword, Twin Devourers, Heavy Venom Cannon, Regeneration, Wings, Armoured Shell, Hive Commander, Old Adversary, Paroxysm, Leech Essence
Bad options: Twin Deathspitters, single set of Scything talons, Toxin sacks, Adrenal glands, Thorax Swarm, Horror, Psychic Scream, Horror
Swarm Lord
This is the special character Hive Tyrant choice. So for 110 points more than the basic hive tyrant, what do you get? Looking at the statistics, you gain a point of Weapon Skill, which takes you to the threshold where a lot of basic troops, such as marines in all flavours only hit you on 5s in combat. This is a massive advantage. However it won't make a great deal of difference against enemy characters. You also gain another wound, which is always nice, and a point of initiative. The initiative is effectively worse than the regular tyrants against elite eldar and grey knights with halberds due to the lack of a lashwhip, but for most opponents, you won't really notice any difference.
The bone sabers inflict instant death regardless of toughness, which isn't bad, but a regular Hive Tyrant can get this built in with Implant Attack without sacrificing its weapon slots. It comes built in with synapse and all four psychic powers as well as Shadow in the Warp, which is useful against a lot of armies. It gets more out of this because it can cast two powers a turn, but it needs to be able to, in order to counter the lack of shooting attacks. The increased synapse range is also very useful for a foot tyrant.
Its four swords give it a 4+ invulnerable (4++) save in close combat which will go a long way to keeping it alive against other armies. No tyranid creature has a ward save, so this is about as good as it gets.
The Swarm leader special rule is okay, the option for furious charge and acute senses will probably not be as useful as taking preferred enemy, but since furious charge on the Swarmlord itself makes it initative 7, this could come in handy on some of the occasions mentioned above.
Alien Cunning is similar to the Hive Tyrants Hive Commander ability, but trades off outflanking a unit of troops for re rolling the side an outflanking unit appears on.
Conclusion:
So we reach the point when we determine if he really is worth including. The Swarmlord comes with a fair amount of special rules, good statistic increases and a 4++ save in close combat, but at quite an expense. Notice there is no option for wings or armoured shell, which doesn't fill me full of confidence in his abilities. Taking everything into account, the Swarmlord can be a competitive choice, but it is perhaps not an optimal one. He just doesn't have the flexibility of the standard tyrant.
Tyrant Guard
Any hive tyrant and indeed the Swarmlord can include a tyrant guard unit of one to three models.
These are expensive costing the same price as the wings upgrade and offer a fairly reasonable statistics line. Above average weaponskill, strength, toughness and attacks, along with two wounds and 3+ saves they are fairly formidable in close combat.
They come for free with scything talons and rending claws, but can trade the talons for either a lashwhip or a bonesword. The entire brood must take the same option. Depending on what you gave your hive tyrant, and if you took Old Adversary, this may or may not be a good idea. Remember the idea with close combat is to be able to kill an enemy unit in their close combat phase, so you can consolidate, then charge again in your next turn. You really don't want to be out in the open in their turn. So with this in mind, you probably don't want to include the boneswords, but you might want lashwhips.
Conclusion:
A unit with strong statistics, but expensive. If included will bring the price of a foot tyrant up to that of a flying one, with nowhere near the speed, but a better close combat ability due to extra attacks. Due to how the unit works, the tyrant cant be picked out by shooting, but as an independant character suffers from wound allocation and can be attacked specifically in close combat. If you buy the tyrant regeneration you can put a wounding hit early onto the tyrant in the hope that you recover it through regeneration and leech essence. I would include one or two of these for a foot tyrant, but none for a flying one. Swarmlord will want his armed with lashwhips.
This is continued in Tyranid Codex Review Part 2
Monday, 23 April 2012
A thought on Mech
As we all know, 5th edition has revolved around mechanised troops
choices. The armies who are better at this are coincidentally those
armies which are stronger than others.
The traditional view is that you place your troops choice in the transport and it protects them from enemy fire, and hopefully gets all the way over to the objective before it is destroyed, although in an ideal world, it won't get destroyed at all.
The normal way to achieve this would be to deploy a lot of transports, to ensure at least some of them make it across the table, but it can still cause you problems if they blow up too early.
One of the things you can do to increase the survivability of your transports is to spend a turn out of the transport, when the enemy small arms weapons are not in range. The idea of this is to try to make your opponent fire his heavy weapons at the troops. Now this might seem a stupid idea, but let me elaborate.
You could have 3 rhinos and three razorbacks, transporting various marines. What I am suggesting is to deploy one unit outside of their transport, or disembark onto an objective early on in the game. The idea is that the enemy will target the troops unit, and shoot them in preference to the rhino. If all goes to plan, you won't loose the entire unit of marines, but they will absorb a significant amount of enemy long range fire. Don't do this within rapid fire range, or it could go badly wrong. Once you have taken a turns worth of fire, hide them back inside the rhino which has been spared a round of shooting.
What you are trying to do is control where the enemy concentrates their fire. He needs to beleive you have made a mistake and thus the unit draws a lot of enemy fire. However as long as one model survives, to get back inside his rhino, the unit is still scoring and you haven't actually lost anything!
The traditional view is that you place your troops choice in the transport and it protects them from enemy fire, and hopefully gets all the way over to the objective before it is destroyed, although in an ideal world, it won't get destroyed at all.
The normal way to achieve this would be to deploy a lot of transports, to ensure at least some of them make it across the table, but it can still cause you problems if they blow up too early.
One of the things you can do to increase the survivability of your transports is to spend a turn out of the transport, when the enemy small arms weapons are not in range. The idea of this is to try to make your opponent fire his heavy weapons at the troops. Now this might seem a stupid idea, but let me elaborate.
You could have 3 rhinos and three razorbacks, transporting various marines. What I am suggesting is to deploy one unit outside of their transport, or disembark onto an objective early on in the game. The idea is that the enemy will target the troops unit, and shoot them in preference to the rhino. If all goes to plan, you won't loose the entire unit of marines, but they will absorb a significant amount of enemy long range fire. Don't do this within rapid fire range, or it could go badly wrong. Once you have taken a turns worth of fire, hide them back inside the rhino which has been spared a round of shooting.
What you are trying to do is control where the enemy concentrates their fire. He needs to beleive you have made a mistake and thus the unit draws a lot of enemy fire. However as long as one model survives, to get back inside his rhino, the unit is still scoring and you haven't actually lost anything!
Friday, 20 April 2012
Threat Rating
This article goes hand in hand with the article I wrote earlier this month about Threat Ranges.
This part concerns what threat rating you assign an enemy unit and essentially what priority it is dealt with in. Some players may go for a traffic light system where red is high priority, orange medium and green low, some may number them one through three but it is essentially the same thing. Even the newest players can grasp that targeting a unit which is demolishing your army is a good idea.
With this article I hope to add some structure to players thought processes to ensure they deal with things in an efficient manner. The first thing to do is to take note during your opponents turn where his units are, and what his threat ranges are. If you have the first turn, look at how he has deployed and base your moves on this. You will need some familiarity with his units capabilities. Don't be afraid to ask if you are unsure on what his units can do, he should explain relevant rules that are affecting his unit as well as the weapons statistics should you not know. This can be more common when playing against an army for the first time, as even reading the book doesn't always commit everything to memory.
This may sound like you are playing a reaction game, and to a certain extent you want to be doing initially. You can make bold moves to force the enemy into making mistakes and reacting to you, but first you need to have an understanding of their capabilities. If you don't your glorious charge towards an objective can be cut short very rapidly. What you need to do first is check on every enemy unit. You need to ask yourself these questions.
1. What threat range does it have?
2. What capabilities does this unit have?
3. Where is it likely to move?
4. What is this units key strength? Is it likely to be shooting, assaulting, objective grabbing, force multiplier etc?
The most important question is what threat range does it have. If the unit is out of threat range of all of your units, you can choose to more or less ignore this unit for now. Now some exceptions can be made, if a unit is very tough, or incredibly lethal in hand to hand, that you might want to shoot it down earlier on, but essentially it can't affect you in your opponents next turn, so you should target something that can as this will keep more of your models alive and this in turn keeps your numbers up to achieve your objectives.
After working this out in your head, start assigning target priorities to your own units. You should hopefully have a good idea what you can expect your unit to do. Unless things are absolutely desperate, a single shot from a tactical squads missile launcher against a Landraider is a waste of resources. The rest of the squad are unable to contribute at anything, and the missile launcher has only an 11% chance of a glancing hit, and no chance of penetrating the tank.
I find the best thing to do is to assign your three top targets for your turn and concentrate on wiping them out. After these have been dealt with, work on the lower priority units, again sorting out another three targets. Doing it in this order should also prevent you accidentally forgetting to move or shoot something critically important.
This part concerns what threat rating you assign an enemy unit and essentially what priority it is dealt with in. Some players may go for a traffic light system where red is high priority, orange medium and green low, some may number them one through three but it is essentially the same thing. Even the newest players can grasp that targeting a unit which is demolishing your army is a good idea.
With this article I hope to add some structure to players thought processes to ensure they deal with things in an efficient manner. The first thing to do is to take note during your opponents turn where his units are, and what his threat ranges are. If you have the first turn, look at how he has deployed and base your moves on this. You will need some familiarity with his units capabilities. Don't be afraid to ask if you are unsure on what his units can do, he should explain relevant rules that are affecting his unit as well as the weapons statistics should you not know. This can be more common when playing against an army for the first time, as even reading the book doesn't always commit everything to memory.
This may sound like you are playing a reaction game, and to a certain extent you want to be doing initially. You can make bold moves to force the enemy into making mistakes and reacting to you, but first you need to have an understanding of their capabilities. If you don't your glorious charge towards an objective can be cut short very rapidly. What you need to do first is check on every enemy unit. You need to ask yourself these questions.
1. What threat range does it have?
2. What capabilities does this unit have?
3. Where is it likely to move?
4. What is this units key strength? Is it likely to be shooting, assaulting, objective grabbing, force multiplier etc?
The most important question is what threat range does it have. If the unit is out of threat range of all of your units, you can choose to more or less ignore this unit for now. Now some exceptions can be made, if a unit is very tough, or incredibly lethal in hand to hand, that you might want to shoot it down earlier on, but essentially it can't affect you in your opponents next turn, so you should target something that can as this will keep more of your models alive and this in turn keeps your numbers up to achieve your objectives.
After working this out in your head, start assigning target priorities to your own units. You should hopefully have a good idea what you can expect your unit to do. Unless things are absolutely desperate, a single shot from a tactical squads missile launcher against a Landraider is a waste of resources. The rest of the squad are unable to contribute at anything, and the missile launcher has only an 11% chance of a glancing hit, and no chance of penetrating the tank.
I find the best thing to do is to assign your three top targets for your turn and concentrate on wiping them out. After these have been dealt with, work on the lower priority units, again sorting out another three targets. Doing it in this order should also prevent you accidentally forgetting to move or shoot something critically important.
Monday, 16 April 2012
Dawn of War deployment thoughts
Having played and witnessed a number of dawn of war missions lately I have learned a number of things.
1. Going first is bad if you try to claim objectives in the middle of the table. While it does allow you to camp on the half way line with your two units and HQ ready for assault, it means when the enemy army comes on in their turn one, their entire army will likely destroy your forward part reasonably easily which puts you at a disadvantage for the rest of the game.
2. Therefore I suggest if you go first you either deploy in the backfield, or reserve everything. Don't feel obliged to deploy anything. Certainly don't deploy for the sake of deploying things. Giving up possession of objectives can cause your opponent to make the mistake covered in point 1, which is likely to help you win the game.
3. If Dawn of War is annihilation it could be an advantage to deploy troops if they are both long ranged and survivable. Otherwise, you are probably better off keeping in reserve and bringing everyone on together. Remember the key is to destroy enemy units, so you want to deploy as many threats as you can to both split enemy fire and concentrate your own.
Some exceptions apply to these general rules Deploying a single Imperial Guard platoon can allow you to field virtually an entire army and is unwieldy to bring on. In this case you can gain all kinds of advantages by camping the middle of the table with a huge amount of models and heavy weapons.
1. Going first is bad if you try to claim objectives in the middle of the table. While it does allow you to camp on the half way line with your two units and HQ ready for assault, it means when the enemy army comes on in their turn one, their entire army will likely destroy your forward part reasonably easily which puts you at a disadvantage for the rest of the game.
2. Therefore I suggest if you go first you either deploy in the backfield, or reserve everything. Don't feel obliged to deploy anything. Certainly don't deploy for the sake of deploying things. Giving up possession of objectives can cause your opponent to make the mistake covered in point 1, which is likely to help you win the game.
3. If Dawn of War is annihilation it could be an advantage to deploy troops if they are both long ranged and survivable. Otherwise, you are probably better off keeping in reserve and bringing everyone on together. Remember the key is to destroy enemy units, so you want to deploy as many threats as you can to both split enemy fire and concentrate your own.
Some exceptions apply to these general rules Deploying a single Imperial Guard platoon can allow you to field virtually an entire army and is unwieldy to bring on. In this case you can gain all kinds of advantages by camping the middle of the table with a huge amount of models and heavy weapons.
Monday, 9 April 2012
Painting Dark Angels
It has been a while since I last put up a painting article. I figured since I am now working on a new Dark Angels army that I would put down the procedure I used to paint them.
Step 1.
I started by spraying the models dark green. I used Army Painter Angels Green, which is a very good dark green, although not really dark enough for Dark Angels in my opinion.
Step 2.
Paint all of the basic details. In this case I used Mechrite red and Boltgun metal on the gun, and body of the marine, Iyandan Darksun for the yellow eagles.
Step 3.
Paint the details on the model. I used Dhenab stone on purity seals paper, Mechrite red on the eyes and use a light amount of blazing orange to highlight the gun.
Step 4.
Next step is to apply the washes. I used Badab black all over the armour of the model and all the boltgun metal parts, being careful to avoid the red as I wanted a warm red to contrast with the dark green. I used Devlan mud to do the purity seals and robes.
Step 5.
Once the model is dry it is time to base it. I use a fairly time intensive process for this. If you have a better method please do use that instead. I first coat the base in Calthan brown. I then dip this in slate for model railways which I purchased from my local modelling shop. This is then left to dry for two hours. I am sure you can leave it less time, but I like this to be totally dry for the next stage.
Step 6.
After it is totally dry I then apply a watered down layer of PVA glue over the whole base. Allow all the excess glue and water to drain off. This should be left an hour to partially dry before the next stage. The reason I do this is because in the past I have had bad experiences of the basing coming off models.
Step 7.
The final stage, apply small amounts of static grass to the base. I find this is best to apply once the glue is partially dry so that the grass doesn’t move around too much. I then left this overnight, as the PVA takes around eight hours to totally dry.
Step 8.
After the base has dried I applied transfers, which were then sealed with matt varnish.
Photos below!
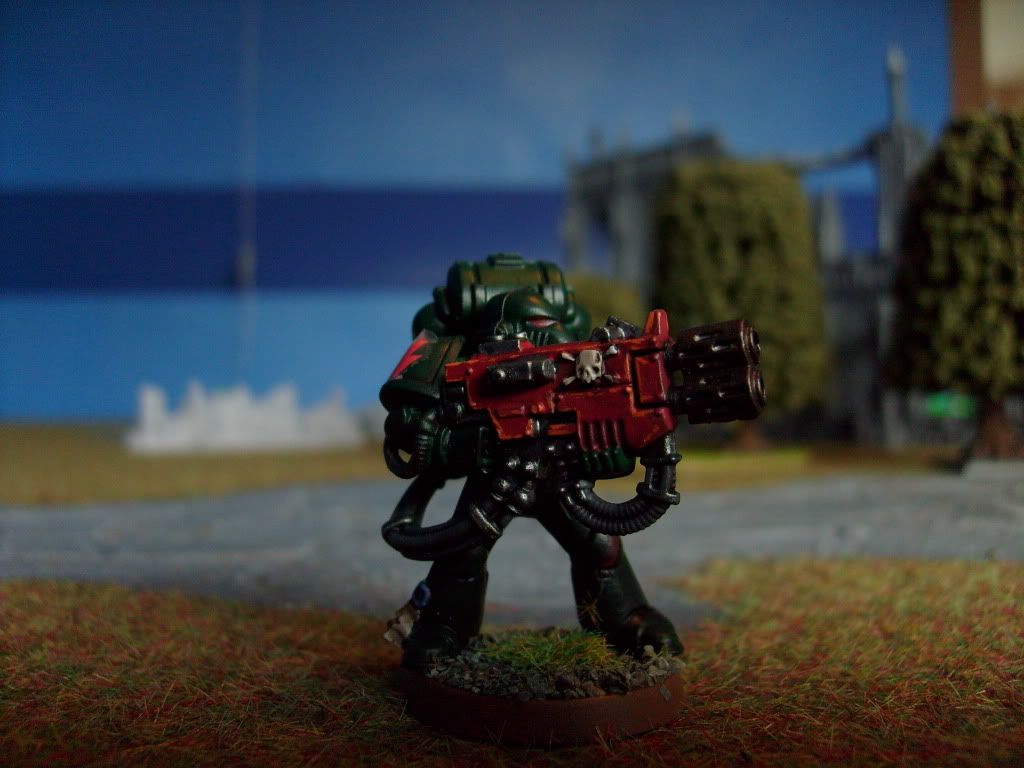
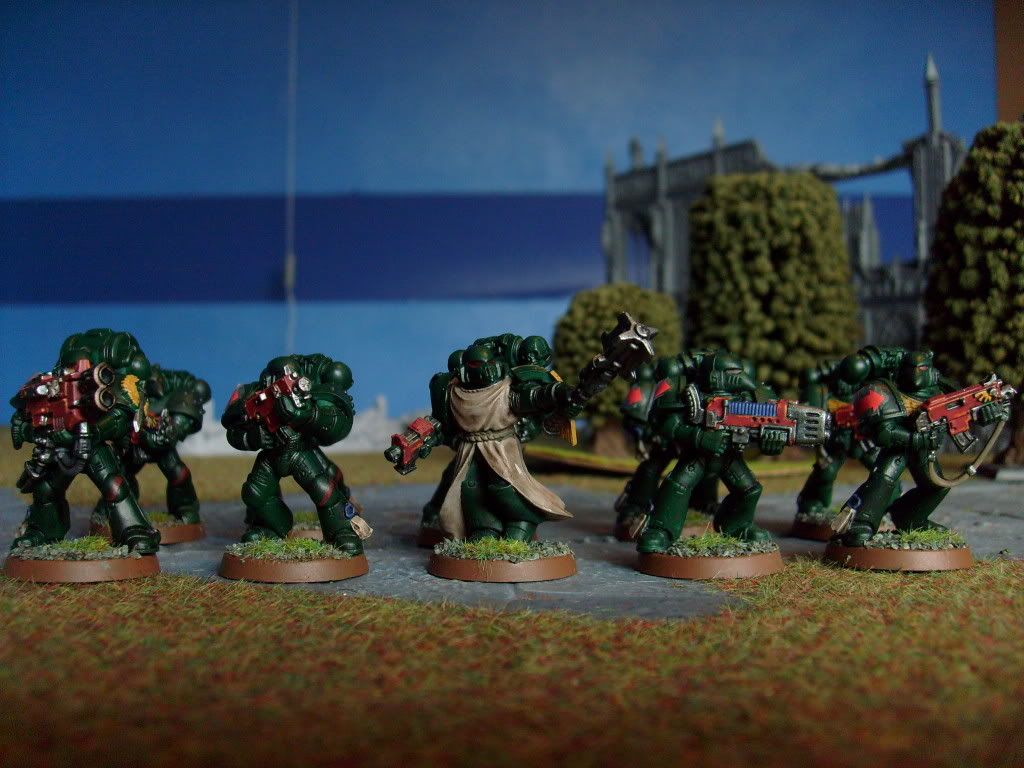
Step 1.
I started by spraying the models dark green. I used Army Painter Angels Green, which is a very good dark green, although not really dark enough for Dark Angels in my opinion.
Step 2.
Paint all of the basic details. In this case I used Mechrite red and Boltgun metal on the gun, and body of the marine, Iyandan Darksun for the yellow eagles.
Step 3.
Paint the details on the model. I used Dhenab stone on purity seals paper, Mechrite red on the eyes and use a light amount of blazing orange to highlight the gun.
Step 4.
Next step is to apply the washes. I used Badab black all over the armour of the model and all the boltgun metal parts, being careful to avoid the red as I wanted a warm red to contrast with the dark green. I used Devlan mud to do the purity seals and robes.
Step 5.
Once the model is dry it is time to base it. I use a fairly time intensive process for this. If you have a better method please do use that instead. I first coat the base in Calthan brown. I then dip this in slate for model railways which I purchased from my local modelling shop. This is then left to dry for two hours. I am sure you can leave it less time, but I like this to be totally dry for the next stage.
Step 6.
After it is totally dry I then apply a watered down layer of PVA glue over the whole base. Allow all the excess glue and water to drain off. This should be left an hour to partially dry before the next stage. The reason I do this is because in the past I have had bad experiences of the basing coming off models.
Step 7.
The final stage, apply small amounts of static grass to the base. I find this is best to apply once the glue is partially dry so that the grass doesn’t move around too much. I then left this overnight, as the PVA takes around eight hours to totally dry.
Step 8.
After the base has dried I applied transfers, which were then sealed with matt varnish.
Photos below!


Thursday, 5 April 2012
Wound Allocation in 5th
Wound allocation doesn't work in a sensible, clear or common sense manner in some scenarios. I will try to explain how it functions and indeed how this could be fixed relatively simply.
Scenario 1. Ten Marines with bolters vs ten Marines with bolters.
10 shots, hit 7, wound 4, four models make saves, the player who has been shot removes any three models. That is nice and simple.
Scenario 2. Ten Marines with bolters vs three marines, two with bolters, one with a special weapon
10 shots, hit 7, wound 4. Wound allocation fun time. You allocate wounds per group of identical armed models. Eg in this scenario you can stack 3 on the bolter guys and 1 on the special weapon, or two on the bolters and two on the special weapon. Spare wounds do not transfer from group to group. So if the bolter guys fail 3 wounds, the spare wound is lost.
Scenario 3. Ten marines, plasma cannon, plasmagun and bolters vs five marines, 1 with plasma gun, and 1 sergent.
This is a more likely scenario and can get complicated fast.
Fire plasmacannon first [as it has more targets to hit at this stage] and hits 5, wounding 5. Plasmagun wounds 1, the other marines bolters inflict say 4 wounds.
So you now have 6 plasma ap2 wounds, and 4 boltgun wounds at ap5 to divide between the 5 models. However, there are three model groups which makes this complicated.
You could for example. stick all 6 plasma wounds on the three bolter models, and put two boltgun wounds on each of the special weapon and sergent, meaning the two more valuble squad members could survive! Notice if you didnt fire the bolters, you would have killed the whole squad. Also if the five man unit didn't have different types of models, they would also all have been wiped out, regardless of the bolters firing or not.
The best way to avoid this problem is to pick weapons that have complimentary ap values. Eg all low or higher than the armour you expect to go against.
It is worth noting that some units can be built to specifically take advantage of this rule. See nobs bikers, space wolf rider things which can both take every model with different gear and they have multiple wounds meaning that the unit can take a huge amount of wounds before losing any models, greatly increasing its survivability and death dealing potential.
My Leman Russ tanks never fire their heavy bolter(s) if enemy in power armour is out of cover. There is no point as it makes the enemy have a chance of saving. It is ridiculous but true that firing more shots means people have more chance of survival. If you really must fire the fore mounted gun, upgrade to a lascannon.
As long as you dont play against people who specifically create these rule exploit units, the rule functions fairly reasonably. I can see why they have done this, but the fact the rulebook itself expressly shows how to use the wound allocation to keep men alive suggests to me GW knew exactly what they were doing when they put this rule in.
The simple solution to this problem would be to just remove any models who take wounds from weapons which cause no save, before wound allocation is applied. That way should the even from scenario 3 occur, you would remove up to six models from the plasma cannon allocated as per the normal rules, then allocate the remaining bolter wounds. In this example, you wouldn't need to allocate the bolter wounds, but if the squad was ten models strong you would. That way you would not be penalised for causing more wounds.
Scenario 1. Ten Marines with bolters vs ten Marines with bolters.
10 shots, hit 7, wound 4, four models make saves, the player who has been shot removes any three models. That is nice and simple.
Scenario 2. Ten Marines with bolters vs three marines, two with bolters, one with a special weapon
10 shots, hit 7, wound 4. Wound allocation fun time. You allocate wounds per group of identical armed models. Eg in this scenario you can stack 3 on the bolter guys and 1 on the special weapon, or two on the bolters and two on the special weapon. Spare wounds do not transfer from group to group. So if the bolter guys fail 3 wounds, the spare wound is lost.
Scenario 3. Ten marines, plasma cannon, plasmagun and bolters vs five marines, 1 with plasma gun, and 1 sergent.
This is a more likely scenario and can get complicated fast.
Fire plasmacannon first [as it has more targets to hit at this stage] and hits 5, wounding 5. Plasmagun wounds 1, the other marines bolters inflict say 4 wounds.
So you now have 6 plasma ap2 wounds, and 4 boltgun wounds at ap5 to divide between the 5 models. However, there are three model groups which makes this complicated.
You could for example. stick all 6 plasma wounds on the three bolter models, and put two boltgun wounds on each of the special weapon and sergent, meaning the two more valuble squad members could survive! Notice if you didnt fire the bolters, you would have killed the whole squad. Also if the five man unit didn't have different types of models, they would also all have been wiped out, regardless of the bolters firing or not.
The best way to avoid this problem is to pick weapons that have complimentary ap values. Eg all low or higher than the armour you expect to go against.
It is worth noting that some units can be built to specifically take advantage of this rule. See nobs bikers, space wolf rider things which can both take every model with different gear and they have multiple wounds meaning that the unit can take a huge amount of wounds before losing any models, greatly increasing its survivability and death dealing potential.
My Leman Russ tanks never fire their heavy bolter(s) if enemy in power armour is out of cover. There is no point as it makes the enemy have a chance of saving. It is ridiculous but true that firing more shots means people have more chance of survival. If you really must fire the fore mounted gun, upgrade to a lascannon.
As long as you dont play against people who specifically create these rule exploit units, the rule functions fairly reasonably. I can see why they have done this, but the fact the rulebook itself expressly shows how to use the wound allocation to keep men alive suggests to me GW knew exactly what they were doing when they put this rule in.
The simple solution to this problem would be to just remove any models who take wounds from weapons which cause no save, before wound allocation is applied. That way should the even from scenario 3 occur, you would remove up to six models from the plasma cannon allocated as per the normal rules, then allocate the remaining bolter wounds. In this example, you wouldn't need to allocate the bolter wounds, but if the squad was ten models strong you would. That way you would not be penalised for causing more wounds.
Subscribe to:
Posts (Atom)